🥦 Blanching multiple vegetables?
Get USDA-based timing for 30+ vegetables — including green beans by size, batch weight, and altitude adjustment.
You pull green beans from the garden (or grab a bag from the farmers market), and the question is always the same: how long exactly?
Too short and the enzymes that turn beans mushy and gray stay active in the freezer. Too long and you've got olive-colored mush before the ice bath even starts. And if you're blanching for a specific use — casserole, a salad, or just straight freezing — the right time is actually different for each.
This guide gives you the exact times for each use case, the science behind why those times matter, and how to do it so the beans stay that vivid green for months.
Why Blanching Green Beans Matters
Green beans contain enzymes — primarily peroxidase and catalase — that continue working even in a frozen state. At 0°F they work slowly, but they work. Left unblanched, your beans will:
- Turn a dull gray-green within 2–3 months
- Develop an off-flavor described as "hay-like" or "grassy"
- Become mushy and stringy rather than snappy
- Lose a significant portion of their vitamin C content
Blanching deactivates these enzymes by briefly exposing the beans to high heat. Once the enzymes are deactivated, the beans are stable for 8–12 months in the freezer with no further degradation.
The ice bath is equally important. If you skip it or use insufficient ice, residual heat continues cooking the beans after they leave the pot. You end up with overcooked beans that are then frozen — worse than unblanched in many ways.
Green Bean Blanching Time Chart
| Use Case | Boiling Time | Ice Bath Time | Result Texture |
|---|---|---|---|
| Freezing (USDA standard) | 3 minutes | 3 minutes | Crisp, snappy — cooks fully from frozen |
| Salads (crisp-tender) | 2–3 minutes | 3 minutes | Bright green, snaps cleanly, slightly tender |
| Green bean casserole | 4–5 minutes | 3 minutes | Fully tender — won't be chewy in bake |
| Stir-fry prep | 2 minutes | 2 minutes | Partially cooked — finishes in the wok |
| Large beans (>¼ inch diameter) | 4 minutes | 4 minutes | Add 1 minute for thick beans |
When does timing start? Always from when the water returns to a full rolling boil after adding the beans — not from when you drop them in. Adding cold beans drops the water temperature; you need it back at 212°F before the clock starts.
Equipment You Actually Need
Large pot: Use the biggest pot you have. Green beans need room — crowding reduces water temperature and produces uneven blanching. A standard ratio is 1 gallon of water per pound of beans.
Ice bath setup: Fill your largest bowl with cold water and a full tray of ice cubes before you start blanching. You need it ready immediately when the beans come out of the boiling water. There's no time to fetch ice.
Slotted spoon or spider strainer: For fast transfer. Colanders work but are slower — every extra second the beans sit in residual steam continues cooking.
Timer: The difference between 3 and 5 minutes is the difference between snappy beans and casserole texture. Don't guess.
Kitchen towels or paper towels: For drying before freezing. Moisture on the bean surface is the main cause of freezer burn.
Step-by-Step: How to Blanch Green Beans
Prep
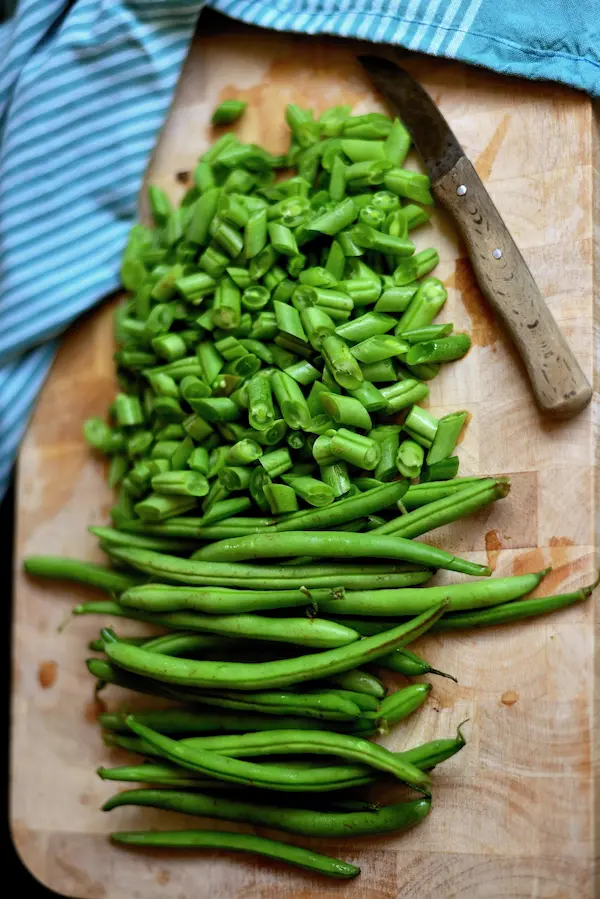
Wash beans thoroughly under cold running water.
Trim both ends — the stem end (tougher) and the tip. You can snap them by hand or cut with kitchen shears. This is also when you remove any strings from older beans.
Cut or leave whole based on how you'll use them. Cutting into 1–2 inch pieces is standard for freezing and casserole. Leave whole for salads where presentation matters.
Sort by size. Thin beans (haricot vert) cook faster than thick standard beans. If you have a mix, blanch in two batches — thin beans 2–3 minutes, thick beans 3–4 minutes.
Blanching
Bring water to a full rolling boil. Cover the pot to reach boiling faster. Add 1 teaspoon of salt per gallon — this is optional but helps maintain color and flavor.
Add beans. Work in batches — no more than 1 pound per gallon of water.
Start the timer when the water returns to a boil. This is the critical step most people get wrong. The beans drop the temperature; you need the water actively boiling again.
Boil for the time specified above for your intended use.
Ice Bath
Transfer immediately to the ice bath with a slotted spoon. Don't drain — transfer directly to stop the cooking instantly.
Keep beans in ice water for the same amount of time as they were in boiling water. This isn't just about cooling — it's about fully stopping the enzyme deactivation process at the right point.
Drain and dry. Spread beans on clean kitchen towels or paper towels. Pat dry. They should be dry to the touch before freezing — surface moisture is the primary cause of ice crystal formation and freezer burn.
💡 Batch tip: Blanch in 1-pound batches maximum. Larger batches drop the water temperature too much and produce uneven results — some beans overblanch while the pot works back up to temperature. Keep the water at a rapid rolling boil throughout.
How to Freeze Blanched Green Beans
Flash freeze first, then bag. Spread dried beans in a single layer on a baking sheet lined with parchment. Freeze for 1–2 hours until individual beans are solid. Then transfer to freezer bags.
This prevents beans from freezing together in a solid block — you can grab exactly what you need without thawing the whole bag.
Remove as much air as possible from freezer bags before sealing. Air is the enemy of long-term freezer storage — it carries moisture that causes ice crystals and allows oxidation. Press the bag flat, or use a vacuum sealer.
Label with date and contents. Blanched green beans look identical to unblanched ones in a bag, and in three months you won't remember which is which.
Storage life at 0°F:
| Preparation | Best Quality | Maximum Safe |
|---|---|---|
| Blanched (properly dried) | 8–12 months | 12+ months |
| Blanched (wet, not dried) | 3–4 months | 6 months |
| Unblanched (fresh frozen) | 3 months | Technically indefinite (safe but poor quality) |
Preserving a full garden harvest?
The blanching timer covers 30+ vegetables with exact USDA times — and adjusts for altitude if you're above 5,000 feet.
Common Mistakes and How to Avoid Them
Mistake: Starting the timer when beans go in, not when water returns to boil
Result: Under-blanched beans. Active enzymes survive and degrade quality in the freezer.
Fix: Watch the pot. Start timing only when you see rapid, full-rolling bubbles again.
Mistake: Using a weak ice bath (too little ice, or warm water)
Result: Beans continue cooking in the "ice bath" and become overcooked before freezing.
Fix: Use a 1:1 ratio of ice to water minimum. Prep the ice bath before you start heating the pot — you need it immediately.
Mistake: Blanching too large a batch at once
Result: Uneven blanching. Beans on the outside overblanch while the center of the batch is still underdone.
Fix: Work in 1-pound batches per gallon of water. The water temperature drop with a large batch is too significant.
Mistake: Skipping the drying step before freezing
Result: Surface moisture freezes into ice crystals around each bean, causing freezer burn on contact.
Fix: Spread beans on towels and dry thoroughly before flash freezing.
Mistake: Freezing in a solid mass instead of flash freezing
Result: Beans freeze together into an unusable block. You have to thaw everything to get a portion.
Fix: Always flash freeze in a single layer on a baking sheet for 1–2 hours before bagging.
Using Frozen Blanched Green Beans
In casseroles: Thaw in the refrigerator overnight, or run under cool water. Don't add frozen beans directly to casserole — the trapped moisture will waterlog the dish.
In stir-fry: Add directly from frozen. The high heat handles them quickly.
As a side dish: Add frozen beans to a small amount of boiling water (or steam) and heat 2–3 minutes. They're already nearly cooked — you're just finishing, not cooking from raw.
In salads: Thaw in refrigerator and pat dry before using. Blanched-then-frozen beans work well in Niçoise-style salads where beans are served room temperature.
Green Beans for Casserole: The Full Process
Green bean casserole requires beans that are fully cooked before baking. If you put crisp-blanched or raw beans into a casserole, they'll be crunchy and undercooked when the dish comes out, because the sauce and oven heat don't provide enough direct heat to the beans.
Process for casserole:
- Blanch 4–5 minutes until fully tender but not mushy (they should bend easily without snapping)
- Ice bath for 3 minutes to stop cooking
- Drain and dry well — excess water will thin your sauce
- Proceed directly to the casserole recipe, or freeze for later
If using commercially frozen green beans in casserole: they're already blanched at the factory. Thaw first, then use as you would the home-blanched beans above.
The Bottom Line
Green bean blanching is non-negotiable for freezer quality. The USDA recommendation of 3 minutes exists because that's the minimum time to fully deactivate the enzymes responsible for degradation — not 2 minutes, not "a few minutes."
Use 3 minutes for freezing, 2–3 for salads, 4–5 for casserole. Equal time in the ice bath. Dry completely before freezing. Flash freeze in a single layer.
That's everything. It takes about 20 minutes to blanch and freeze a full pound of beans correctly. It's the difference between beans you'll actually eat in February and a bag of gray mush you'll quietly throw away.
Related Reading
- How to Blanch Vegetables — The complete guide to blanching technique for any vegetable
- Why Blanching Prevents Freezer Burn — The enzyme science behind why this step is mandatory
- Blanching vs Steaming — When to use each method for preservation
- How to Freeze Garden Vegetables — Blanching and freezing guide for 20+ crops from a full harvest